|
This
web-based application facilitates crewmembers with an efficient means of
accessing, viewing and in some cases amending details pertaining to Personal
and Flight Information. Each
option and utility found within the application can be activated with optimum
simplicity and offers an array of resourceful information. Sub-options are
also available to help increase efficiency and flexibility when it comes to
the management of information. All
details viewed and/or amended within certain options, essentially derive
directly from a web server, which has instant access to an airline’s
database. This ensures that records are kept up to date and where need be,
adjusted accordingly.
Hold
your mouse over the ‘e-Crew Options’ icon to view the list of available
options.
WEB
SERVER USERS SUB-OPTIONS OPTIONS
This option provides Crewmembers with information
related to scheduled, estimated or actual flight times for both departures
and arrivals for a specific date.
This information can be filtered in various ways as outlined below. Flight Search Criteria In the print screen below, Departures from MIA on
the 15th of March, 2001 in UTC have been displayed by making the
appropriate selections in the field provided at the top of the screen and
then pressing ‘Continue.’
Filter the information to be displayed by making the
appropriate selections.
All possible combinations are listed below: ·
All Departures from | Enter an airport code | Select a date Displays all departures
from that airport on the specified date. ·
All Arrivals at | Enter
an airport code | Select a date Displays all arrivals at
that airport on the specified date. ·
Flight number | Enter Flight number | Select a
date If
flight operates on specified day, related information will be displayed. ·
Carrier |
Enter Carrier code | Select a date When applicable, will
display flights operated by selected carrier on the specified date. ·
AC | Enter an aircraft type | Select date Displays all flights
related to that aircraft type on the specified date.
The following table displays the general flight
details pertaining to the selection made in the previous option (Flight
Search Criteria). You may view additional information for each flight
by ‘highlighting’ a desired flight number and clicking on any one of the
three options listed below. A new window will open with the requested
details. ·
Associated Displays the aircraft
routing based on the specified flight number. ·
Associated Trip Details Lists all flight legs
associated with the selected flight as well as details of assigned crew and a
provision to alternate between Local and UTC times. ·
Crew On Flight Lists the crew assigned
to a particular flight. Highlight a row and click on one of the options below
to view additional information.
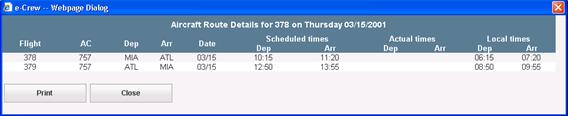
View
all flight legs of the aircraft route associated with the selected flight.
Information displayed will include scheduled, actual and local departure and
arrival times.
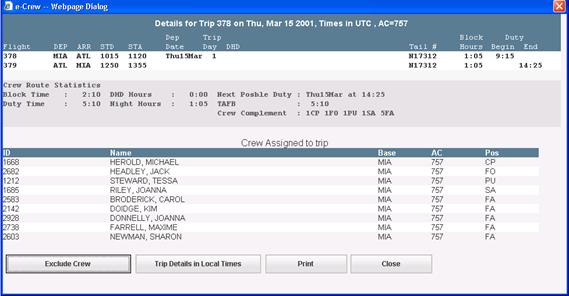
This feature offers a comprehensive view of flight
details including crew complement and crew personal details, trip details,
FDP and TAFB times, etc. You have the option to alternate between Local and
UTC time as well as choose to ‘view’ or ‘hide’ crew details by clicking on
one of the following buttons:
Hides the crew names assigned to the trip. (This button
will alternate to display ‘Include Crew’ and vice versa when selected)
Re-displays the crew names assigned to the trip.
Display trip details in UTC time. (This button will
alternate to display ‘Route Details in Local Times’ and vice versa)
Displays trip details in Local
Time.
Comprehensive view of trip
details
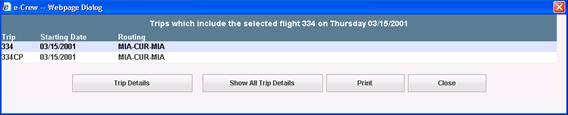
In
the event that a selected flight appears in more than one trip, an additional
option will be included in the Associated Trip
Details screen. You
may also view additional trip details by ‘highlighting’ a desired trip number
and clicking on one of the following options:
·
Show All Trip Details: Show trip details for each trip associated
with the flight leg that was selected. (Note: Details of assigned crew and
provisions to alternate between Local and UTC times are not included in this
option).
If more than one trip applies, this option provides
details of all trips
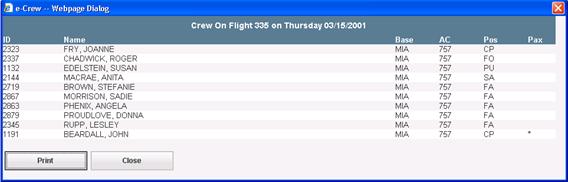
Lists details of crew assigned to
a particular flight. If a Crewmember is assigned to PAX onboard a flight an
asterisk will be displayed in the ‘PAX’ column.
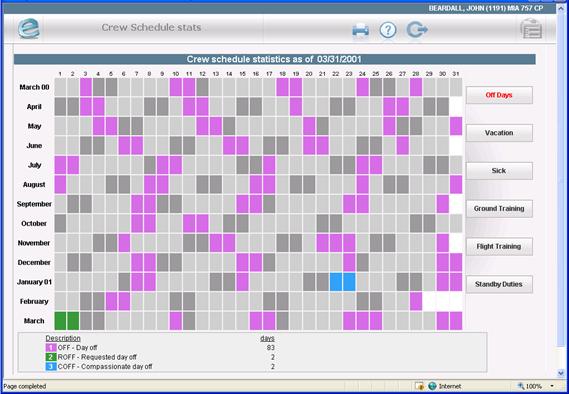
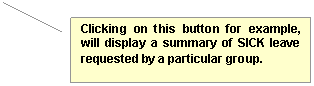
This option provides statistics related to your
schedule from the end of the current published schedule back one year. The date directly below the Crew name
indicates the last date of the published schedule. The statistics available are related the following:
‘Off Days,’ Vacation,’ ‘Sick,’ ‘Ground Training,’ ‘Flight Training,’ and ‘Standby
Duties.’ The initial screen will display your ‘Off Days’ for
the previous year by default. By selecting one of the options to the right,
the calendar will display all codes related to the selection made. Below the calendar is a description of each of the
codes related to your selection as well as a total. Up to 4 codes and the
associated totals will be separately displayed. If there are more than 4
codes associated with the selection made a 5th total will be
displayed which combines all other codes and totals.
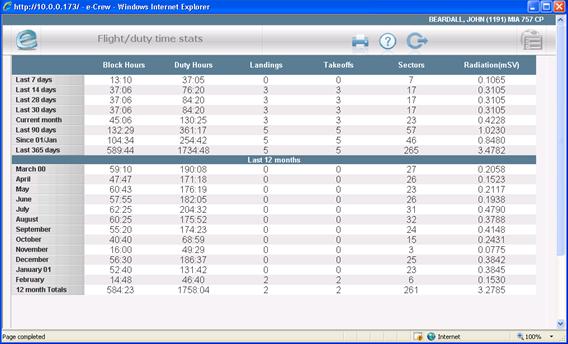
Provides totals for Flight and Duty times,
Landings, Takeoffs and Sectors. All totals are based on actual times with the
exception of the Current month column. This column provides a
total of the actual and scheduled information for the current
month. Note: Radiation (MicroSv or MilliSv) totals may not be
shown if your airline does not use that option.
This
component details your leave entitlements and is separated into two basic
categories: ·
Leave
already taken = T ·
Leave
already booked = B In
total, approximately one year’s activity is shown. You may request either a
display of the current or next year’s data (as defined in related check box).
Additionally you are able to view leave already taken/booked, annual
entitlement, leave carried forward and corresponding totals. Total
entitlement leave is the sum of the annual entitlement and any leave that has
been carried forward from the previous year’s leave, and is displayed
directly above the chart. Total
taken leave refers to the sum of the taken leave and the already booked
leave. This figure is also displayed directly above the chart. Where
applicable, the selection box to the right of screen offers a provision to
view alternative leave details.
This option will provide you with your personal
expiry information for each type of training required.
You may view your training history here. The table lists records in descending order
with the most recent training undertaken displayed in the first.
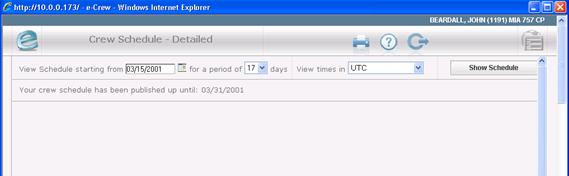
Generates
a view of your schedule for a specified period of time (maximum 31 days), including
any changes. From
the filter options at the top of the screen, specify a starting date from the
calendar, the number of days you wish to view from the drop-down box and
whether you wish to read the information in UTC, Local Station or Local Base
time. Click
<Show Schedule> to complete
the process and ‘View your Personal Crew Schedule.’ <Reset> will return the screen to
default values. Note:
The ‘Crew Schedule published until’ date is also viewable on this screen.
Filter
options
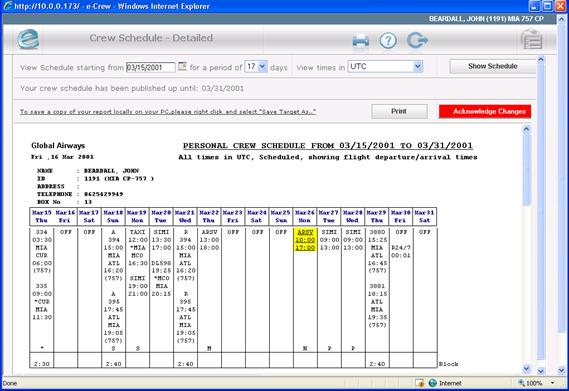
This
screen displays a detailed breakdown of your personal schedule. Click <Print> so
that you may access a smaller (printable) version of the schedule. An
automatic alert will advise you of the necessary steps required to
successfully print a copy of the schedule table.
Note: ·
Changes to your roster are displayed with a yellow
background and an ‘N’ appears within a cell for that given day. It is essential you acknowledge these changes by clicking
on ‘Acknowledge Changes.’ ·
The ‘Acknowledge Changes’ button will only appear when a field is marked with an ‘N’ and subsequently disappear when
clicked, taking into consideration a Crewmember has acknowledged any changes.
Displays a breakdown of your
personal schedule. On entering this screen, an
automatic alert will advised you of the necessary steps required to
successfully print a copy of the schedule table. If you have cancelled the print
in error, you have the opportunity reprint by clicking on the <Print>
button.
Smaller printable view
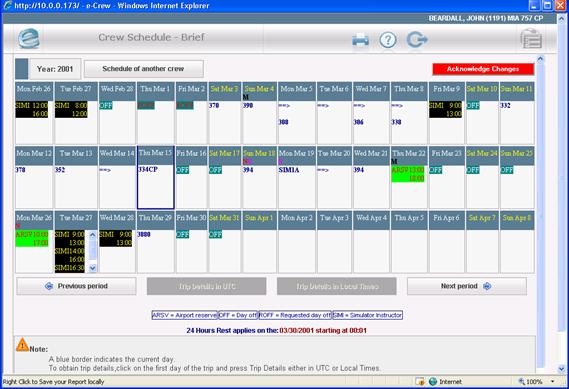
Displays schedule information for any given month
in a calendar type format. By default this option will display information
for your current month’s schedule. There is an option to alternate between UTC and
Local time for specific trip details and a provision to display the previous
or next month’s schedules by clicking on the related buttons.
Note: ·
Within each cell, you are able to see the status of your
schedule, which is displayed in an abbreviated format. Explanations for each
abbreviation are highlighted in the table situated directly beneath the
option buttons. ·
Where a red ‘N’
appears within a cell, this will refer to changes that have been made to your
schedule for that given day. It is essential you
acknowledge these changes by clicking on the ‘Acknowledge Changes’ button.
·
The ‘Acknowledge Changes’ button will only appear when a field is marked with a red ‘N’ and
subsequently disappear when clicked, taking into consideration a Crewmember
has acknowledged any changes. ·
A white ‘M’ means that a memo exists on that day. To view
the memo information, simply click on the M which will display a message box
at the bottom of the screen.
Displays and allows for changes to be made to your
personal information. Updates can only be made to fields which have been
activated by your Administration. If your airline requires you enter a password when
logging into e-Crew and allows you to change that password, you may do so
from this screen. Information that is displayed in grey asterisks
means you do not have access to change it. Text in bold black lettering can
be changed. Asterisks in place of text means that this information is not
available for Crewmembers to view or update. In the example below, Crew may change their
physical/mailing address(s) and next of kin information can only be viewed,
not changed. Once you have made a change, be sure to press
‘Update’ to save your changes.
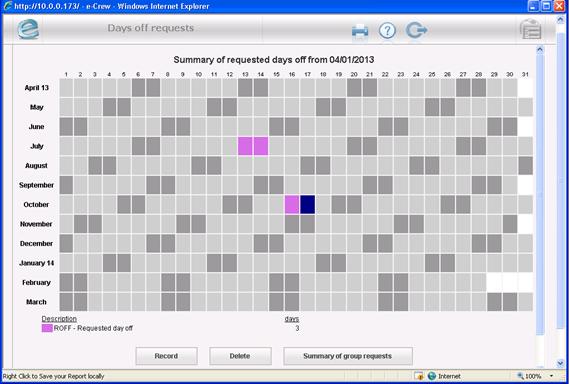
This option allows you to enter a request for a
‘Day(s) Off’ starting on the first day after the published date and forward,
up to a year in advance. You may also view requests made by other Crewmembers
in the same base, position and aircraft type as yourself. Note: The requests made here are only requests and are not
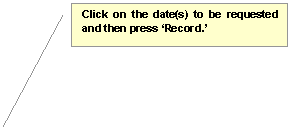
considered approved until reviewed by the Crewing Department. Entering a Day Off Request To request a single day off, left click on the
desired day and press <Record>. To select a block of days, left click on the
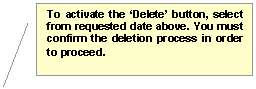
first day, then right-click on the last day and press <Record>. A requested ‘Day Off’ may be deleted by selecting
the desired day (color turns dark blue) and then pressing the <Delete> button. Once the delete
button is pressed, an alert will appear prompting you to verify your changes.
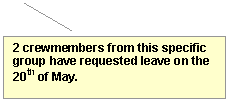
Select the option to view
the group statistics. Each day for the next year will show the total number of
Crewmembers who have requested a ‘Day Off’ on that specific date, in the same
base, position and aircraft as you. At the bottom of the screen is a summary
total. This screen is for viewing purposes only and cannot be amended.
This option allows you to enter a request for
‘Vacation’ starting on the first day after the published date and forward, up
to a year in advance. You may also view requests made by other Crewmembers in
the same base, position and aircraft type as yourself. Note: The requests made here are only requests and are not
considered approved until reviewed by the Crewing Department. Entering a Leave Request To select a single day for leave (Vacation) left
click on the desired day and then press <Submit>. To select a block of days, left click on the
first day, then right-click on the last day and press <Submit>.
A requested ‘Vacation’ day may be deleted by
selecting the desired day (color turns dark blue) and then pressing the <Delete> button. To select a block of
days, left click on the first day, then right-click on the last day and press
<Delete>. Once
the delete button is pressed, an alert will appear prompting you to verify
your changes. Note: ·
A 7-day block of light gray and gray cells represents one
full week from Monday through to Sunday. ·
An exclamation mark indicates that a day has already been
occupied with another duty, and hence cannot be selected.
Although this option will display a summary for all
leave categories, you only have the ability to add and/or delete days for the
first leave category (e.g. LVE). You may specify the type of leave you would like to
view by clicking on the associated buttons (<Vacation>,
<Compassionate Leave> etc.) The amount and type of leave displayed is subject
to the settings enabled by your Airline (consult your manager or the
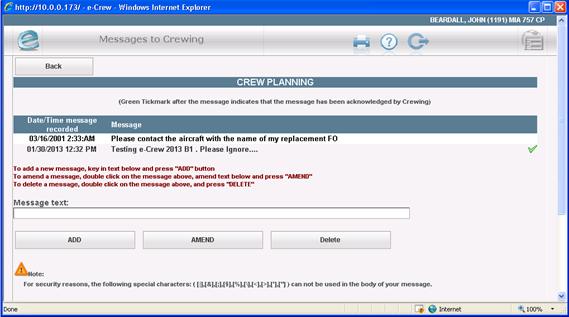
This option provides a means for the Crewing
Department and/or various Administrative Departments such as Pilot
Management, to send a message to you. When a message(s) is sent, a message will appear on
the e-Crew home page as shown below.
After acknowledging and/or deleting a message(s), the message will no
longer be displayed when you return to the main page.
To acknowledge and delete more than one message, tick
the box next to messages to be deleted and then press the ‘Acknowledge and
delete all selected messages.’ Use the ‘Acknowledge and delete all messages’
to remove all messages from the
screen. A single message may be acknowledged and saved for
future reference by selecting ‘Acknowledge Message.’ When this option is
pressed, a blue tick mark will appear to the far right of the message in
order to easily identify between new messages and saved messages.
Attached files If
Crewing have attached a document to a message, a ‘paper clip’
Double click on the ‘paper clip’
icon and make the ‘file download’ selections as required.
This option allows you to send a message(s) to
various departments such as Crewing, Flight Operations or Flight Deck
Management. The departments are defined by your airline. To send a message, first click on the appropriate
message category to display the applicable screen.
Use this option to create, amend and/or delete a
message. The option to delete a message is only available if activated by
your airline. Once a message has been acknowledges by the appropriate
department, a green tick mark will appear to the far right of the message.
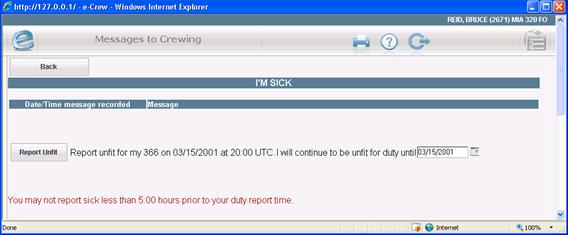
Some airlines allow
Crewmembers to report ‘Unfit’ or ‘Fit’ for a duty period through the
messaging system of e-Crew. If this
option is enabled, the applicable messaging screens are different than all
others.
Reporting Sick for Duty To report sick for duty, the
Crewmember must enter the “I’m Sick” option, select the date(s) they will be
sick for and then press the “Report Unfit” button.
Note: By default, the date displayed in the date selection
window will reflect the next duty period that the Crewmember may report sick
for. After selecting “Report Unfit,”
the Crewmember will be asked to confirm this process before the duty is
automatically removed from their roster. Press “Cancel” to return to the screen.
Since route 366 is a multiday
route, once the Crewmember presses “OK,” all three days of the route will be
replaced with the applicable sick code. Once the Crewmember reports sick,
a history will be recorded including the date/time the transaction was processed
by the system and the duty they reported sick for.
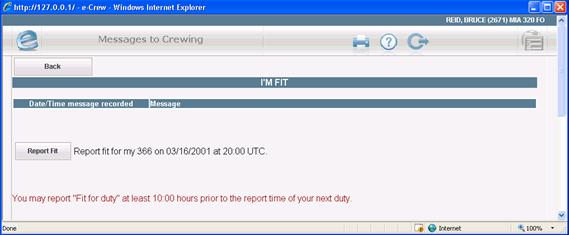
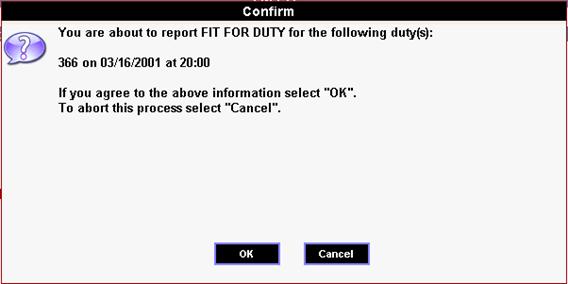
Reporting Fit for Duty When a Crewmember is ready to
return to work, they may report fit for their next duty by entering
the “I’m Fit” option and selecting “Report Fit.” For reference, the system
will automatically display the information of their next duty.
After selecting “Report Fit,” the
Crewmember will be asked to confirm the process.
By pressing “OK,” the process is
completed and a history of the fit for duty transaction is recorded.
The The report which is displayed here
can be configured from the
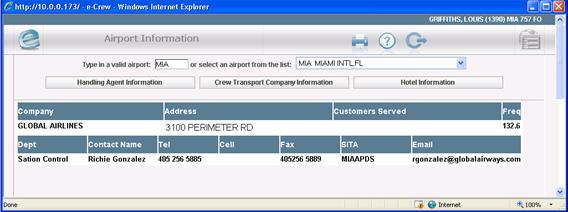
Provides business and contact details for Handling
Agents, Crew Transport Companies and Hotels. To search for an airport, either enter the airport
code into the field provided (i.e. MIA) or make a selection from the drop
down menu, situated to the right of the code field. If the entered airport is
valid (meaning activated by your airline). Once an airport is selected, the three
options shown below will be displayed.
Handling Agent Information
Crew Transport Company Information
Hotel Related Information
The allowance report provides monetary totals for
each individually duty period as well as combined totals for the period
selected. To view the report, enter a date range of any
previous roster period and then click <Continue>.
This option allows Crew to obtain
a list of all open MEL items related to the aircraft(s) the Crew are schedule
to operate within the next few hours.
|